Scan Jobs
CyberCNS lists out jobs initiated at a company level in this section. A Job is simply some system task such as a Vulnerability Scan or AD Scan that is running. This helps to get an idea about the status of different scans along with reasons for success or failure.
In the Jobs tab, we can see the status of scans, whether it is a success( ), failure(
 ), or partially (
 ) , complete.
Click on the Updated column or use the Action can get the details of the job which is successful.
It is possible to download the Full data or the Filtered data of the Jobs by clicking on the ( ) download option, where the data will be downloaded in xlsx format.


.jpeg?version=1&modificationDate=1688139735749&cacheVersion=1&api=v2)
.jpeg?version=1&modificationDate=1688140152370&cacheVersion=1&api=v2)
.jpeg?version=1&modificationDate=1688140155979&cacheVersion=1&api=v2)
.jpeg?version=1&modificationDate=1688140203185&cacheVersion=1&api=v2)
Click on the filter and click on Choose job status in that you will get all the job statuses like success, failure, partial, running, and all.

Click on the filter and click on Choose Tasks and you will get all the jobs statuses like All, Active Directory scan, Asset inventory scan, Firewall san, snmap scan, PI scan.

In the depicted below image, you will get a filter of the Job details job status, and different types of tasks, and add the scheduler Name.

In the below image, the details of Asset SNMP Job Status with REASON, STATUS, DISCOVERED PROTOCOL, RISK SCORE, NOAUTH VULSCOUNT, and BASE SCORE when the job status is partial.


Scheduler Report Jobs

Under the column, these are options available for jobs like created, updated, Job Status, job id, Agent Name, and Task.

Under the Filter column, these are options available for jobs All, Running, Success, Partial, and Failed.

To view the details of the Report Scheduler click on Details.
Here can see the details of the Report Scheduler with Report Name, Report Type, Reason, and Status.

Under the Action column, these are options available Details, Terminate, Retry, and Download Report.
If the job fails, click on the retry option to re-run it.
In case need to terminate the scheduled job can use the option to terminate.
At the moment, Standard report jobs that have been successfully or partially completed allow those generated reports to be downloaded using the available download report option.


Patch Jobs


Agent Event Logs

Azure Active Directory Jobs
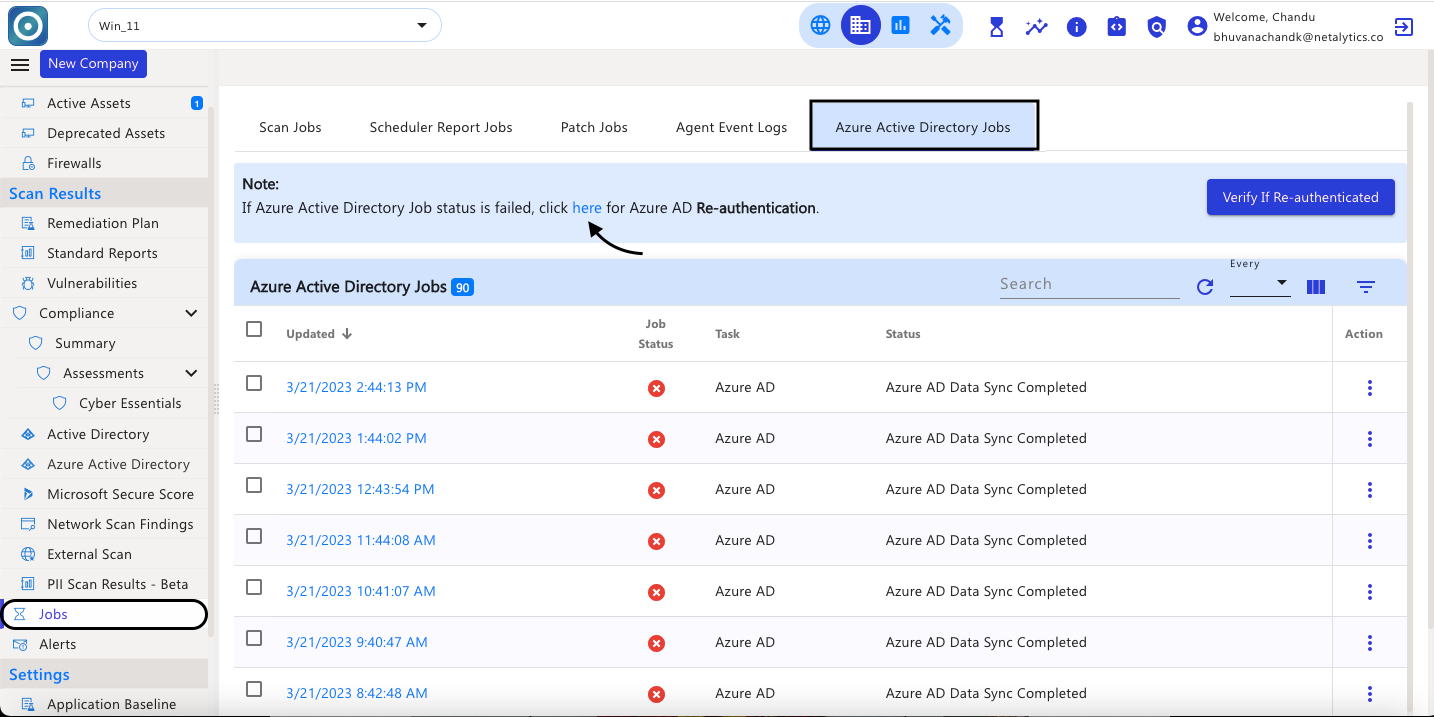
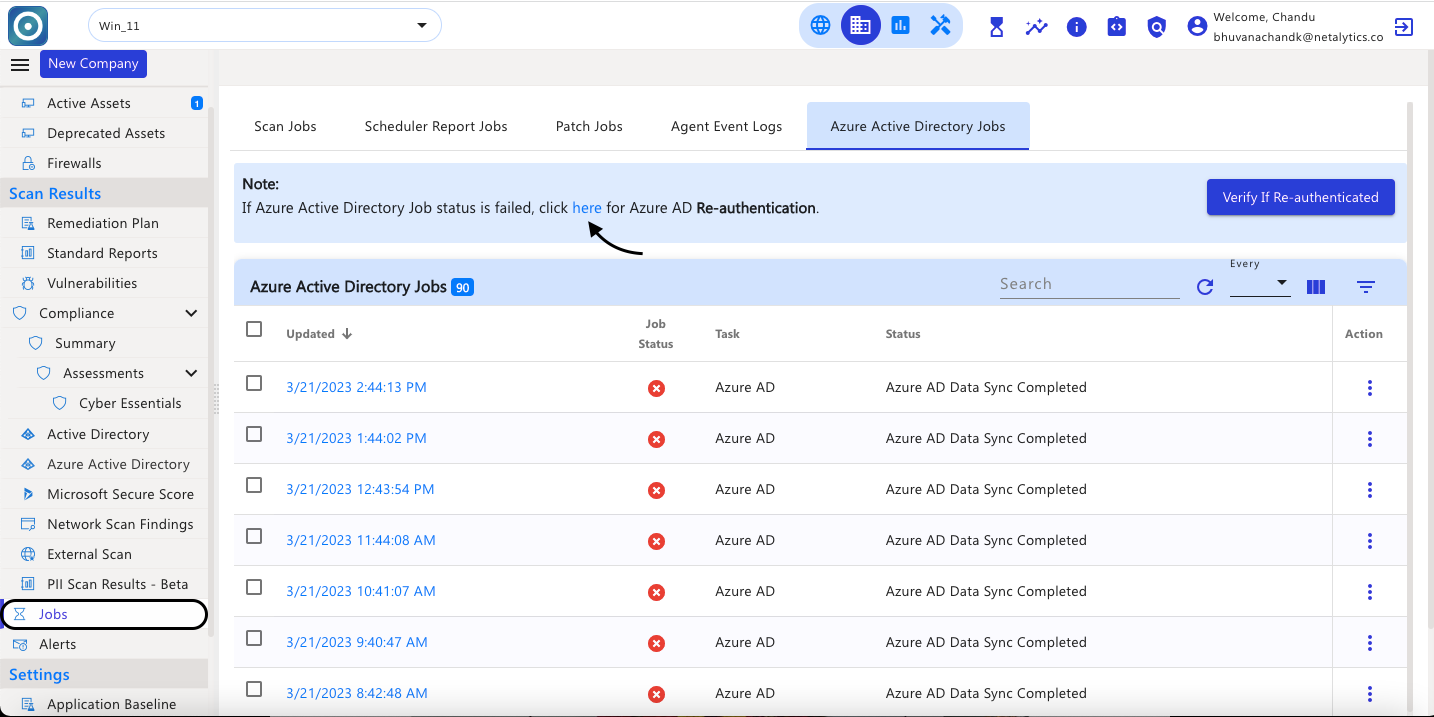
Azure Active Directory relatedDirectory-related jobs with details ( failed with errors and successful) can be referred to in this section. |
When Azure AD Integration is added successfully and a company mapping is set for the required company, that company will show Azure Active Directory under the main menu.
Navigate to the Azure Active Directory at the company level and select the Sync Now option to scan for data at that time. This will create a job and the status of the job can be viewed under the jobs section.

Navigate to the Jobs> Azure Active Directory Jobs section, to view the successful job completion or the status of the job.

Once the scan completes successfully, in the Azure Active Directory section, the details of Users, Computers, Groups, and Licenses are captured.

Azure Active Directory Scan - For Azure Re-authentication(90 days token expiry issue)
When the job fails click on Updated time or under the Active column select the details option to view the status of the failure of the job.

While checking job details, the status of the success or failure of the jobs is seen. In case the particular job fails the error message of the job can be seen here for details.

If the Azure Active Directory Scan fails, in the note section click on the click here option for Azure Re-authentication. This click will initiate the re-authentication process for Azure Active Directory.

Now confirm whether the user has Global Admin access with valid permissions (If yes, select the checkbox and click on Next).


Once the above steps are completed, click on Verify if Re-authenticated, and then the pop-up will be shown as Process initiated successfully.

Azure AD Data Sync job initiated can be seen.

Once the successful completion of the job, the data will be populated under Azure Active Directory.

If any one or more Azure AD component fails → Follow the below steps
When the job fails click on Updated time or under the Active column select the details option to view the reason for the job failure.

Under job details, the status of the success or failure of the jobs can be seen. In case the particular job fails the error message can be seen.

If the Azure Active Directory Scan fails, in the note section click on the click here option for Azure Re-authentication.

Now confirm whether the user has Global Admin access with valid permissions (If yes, select the checkbox and click on Next).


Once the above steps have been completed, a notification pops up as Azure AD Consent added successfully. Post which please click on Verify If Re-authenticated.

Once clicked on Verify if Re-authenticated, then the pop-up will be shown as Process initiated successfully.

Azure AD Data Sync job initiated can be seen.

Once the jobs are successfully completed, the data will be populated under Azure Active Directory.

Troubleshooting
Case 1: Dial tcp <ipaddress>:445 failure
For this issue run the below command on the reported host and initiate a scan. These commands will help set SMB as True and help successfully scan an asset.
-> Set-ItemProperty -Path "HKLM:\SYSTEM\CurrentControlSet\Services\LanmanServer\Parameters" SMB2 -Type DWORD -Value 1 -Force
-> Set-NetFirewallRule -DisplayName "File And Printer Sharing (SMB-In)" -Enabled true -Profile Any
-> Set-NetFirewallRule -DisplayName "File And Printer Sharing (NB-Session-In)" -Enabled true -Profile Any
Case 2: No credential matched
For Active Directory Credentials, ensure that the Domain is added as a fully qualified domain name(FQDN) has been added, Active Directory DC Name to have the IP address( In case of DNS resolution failure, Asset Name will not work). Please refer to the screenshot below

2. For the Asset Inventory scan credential match issue, please follow the steps below to verify.
This tool will verify the SMB communication between the probe agent and the remote asset. If this tool succeeds the communication from the agent machine then the probe agent will scan the remote asset for the vulnerabilities successfully, giving the Risk Score for that asset.
https://betadev.mycybercns.com/agents/validateSMB.exe
>>./validateSMB.exe -hostname <IPAddress> -username <Username> -password <Password> -domain <domainname>
Note: Please add a password in double quotes.
Eg: >>./validateSMB.exe -hostname 10.10.10.22 -username cybercns -password “asdfghj” -domain cybercns
Case 3: OS type not detected
If there are no open ports detected by the nmap port scan from the CyberCNS agent; it will only obtain a nmap ping, which is the reason why it shows OS type not detected. Based on the open ports found, the detection of the OS type is done. since it did not return any value the error “OS Type Not detected” will be shown. To confirm, run the below commands from the agent machine.
-> cd C:\Program Files (x86)\CyberCNSAgentV2\nmap
>>nmap.exe -sT --top-ports 3300 <IP Address>
If the output of this command returns as no ports open, then the error given above is correct.
If the output of this command returns ports, means that ports are found open. In this case please provide a screenshot to Support to look into further.
Case 4: No Active Assets Found
We can find the agent log to determine the cause of this issue in the cybercns.log file. Agent log can be located on the agent system at the "C:\Program Files (x86)\CyberCNSAgentV2\logs" |
1. The Nmap scan fails due to the permission issue when installing dependencies like
npcap and VC_redistx86. (windows)This can be resolved by manually installing the agent.
Open command prompt as administrator in agent machine
Step 1: stop agent services
Step 2: Navigate to the agent nmap folder and install npcap and VC_redist x86 manually.
C:\Program Files (x86)\CyberCNSAgentV2\nmap
Step 3: on successful installation initiate a scan in the Cybercns portal.
2. It may be the older version of the npcap driver present on the machine that is not supporting the agent. Please uninstall the npcap using the below steps.
Open command prompt as administrator in the agent machine
Step 1: stop agent services
Step 2: Uninstall the npcap / pcap driver from the agent machine
Step 3: Reboot the machine
Step 4: Initiate the scan from the Cybercns portal, which will automatically install the latest NPCAP OEM version and run the scan normally.
Multiple options can be selected.
This completes the Active Assets documentation.
![]() ), failure(
), failure(![]() ), or partially (
), or partially (![]() ) , complete.
) , complete.![]() ) download option, where the data will be downloaded in xlsx format.
) download option, where the data will be downloaded in xlsx format.


.jpeg?version=1&modificationDate=1688139735749&cacheVersion=1&api=v2)
.jpeg?version=1&modificationDate=1688140152370&cacheVersion=1&api=v2)
.jpeg?version=1&modificationDate=1688140155979&cacheVersion=1&api=v2)
.jpeg?version=1&modificationDate=1688140203185&cacheVersion=1&api=v2)


