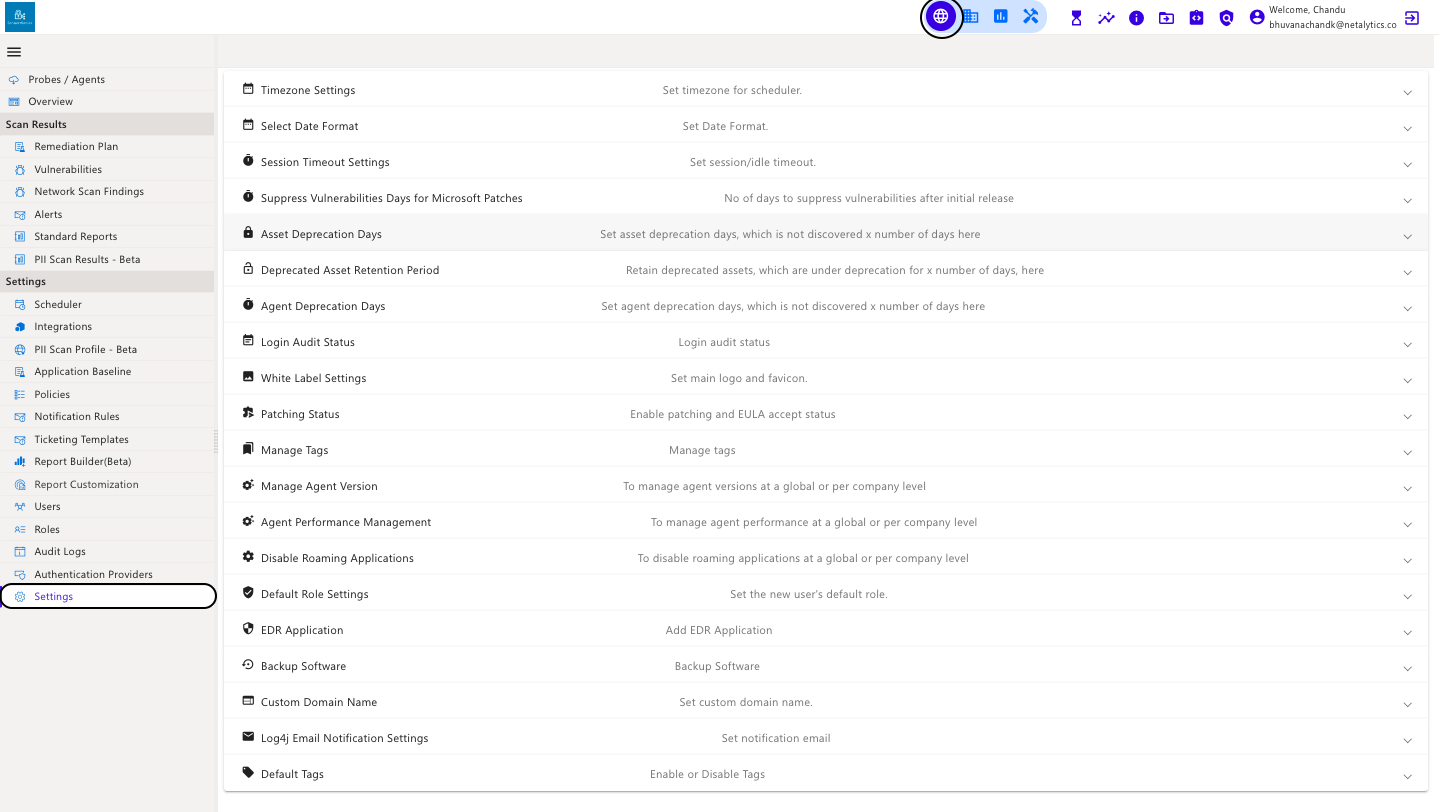
All the settings in this section are applicable Globally.

On the Global Settings menu((blue star)) Navigate to the Settings tab.

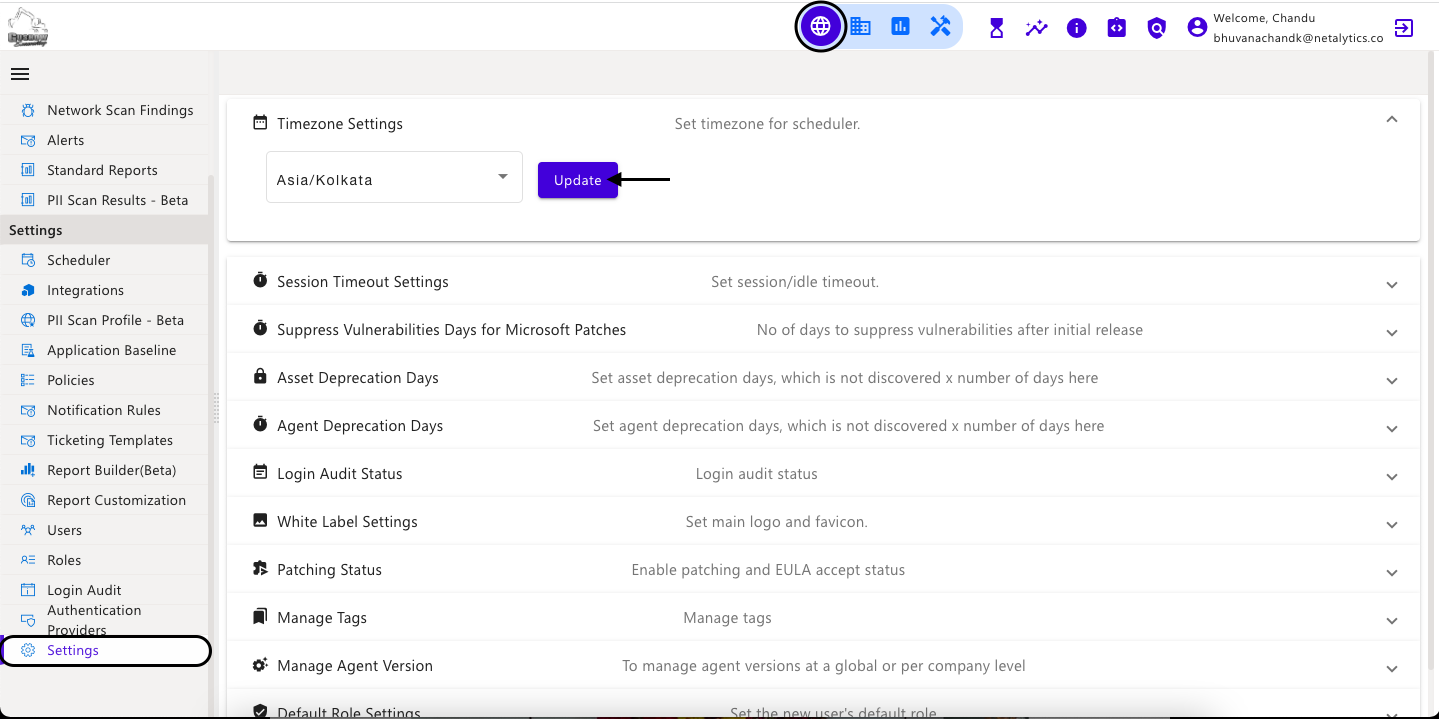
  • Set the timezone and update it here globally.

  • All scheduled actions will be performed based on the Time Zone set here.

  • Once it is updated, it is indicated by the True, Success, message.

  • Select the Date Format and Click on Update. This will be reflected both on Global Level and Company Level as well. This date format will NOT apply to dashboards and reports.

  • This section can set the CyberCNS session timeout as per the requirement. Parameters like Session Idle time, Wait time for Idle Session, and Session Logout time in minutes can be set here. Once these values are set, click on Update.

  • Once the settings are updated it is indicated by, the Settings updated, message.

  • Using Suppress Vulnerabilities, the vulnerability/ies for Microsoft OS can be suppressed for a duration as required after the initial release.

  • The number of days to suppress has to be entered after which the Update button has to be clicked to save the settings.

  • The Microsoft OS vulnerabilities for the respective assets are suppressed for the specific number of days entered, starting from the day of initial release.

  • The suppression days are calculated from the day of initial release of the patch. 

  • The vulnerabilities will not be displayed for the specific duration for which they are suppressed.

  • If the entered number of days is less than the duration between the date of entry and the release date, the vulnerabilities will be shown after the scan.

  • If the entered number of days is greater than the duration between the date of entry and the initial release date, the suppressed vulnerabilities will not reflect until the specified duration is completed.

  • The vulnerabilities would be displayed again under pending remediations after the scan once the suppression period has expired.

  • In the image below you can enter the asset deprecation days as per the requirement. Once set, post the next scan the deprecation value will be considered and the deprecated assets will be moved to the Deprecated Assets tab.
  • In the image below you can enter the agent deprecation days as per the requirement. Once set, post the next scan the deprecation value will be considered and the deprecated agent will be moved to the Deprecated Agent tab.
The deprecated asset retention period helps you to clean up deprecated assets based on the period mentioned in this section. If the Deprecated Asset Retention Period is entered at Global level, then it will reflect for all the companies. The Retention Period for that particular company can be changed at the company level.

  • If Log4j Vulnerability is detected, An alerting Email will be sent to the entered Email.

Once the login Audit is enabled, it cannot be disabled.

  • Login Audit ability can be enabled to view the number of users logged into the CyberCNS Portal from this section.

  • Once the Login Audit is enabled, can get details of the Users like username, method, type, time, and reason.

  • In this section, can define the Top menu logo which is seen after login, and Favicon Logo. Select the files to upload here.

(blue star) Favicon Logo (A favicon is a small, 16x16 pixel icon used on web browsers to represent a website or a web page).

  • As depicted in the below text, follow the Default Logo and Sizes:

  1. Top Menu - cybercns_logo.png - 208 × 50 pixels (intrinsic: 250 × 60 pixels)

  2. Favicon - cybercns_only_logo.png - 128 x 128 pixels

(blue star) Uploading all images at once is Mandatory.

  • In the Confirmation dialog, click on Yes to proceed to update the Logos.

  • If Custom Domain is used, Please use the same Domain name as the Product Name to display that Domain Name in the Portal instead of CyberCNS.

  • In the global view of the white label settings, there is an option called "Terms of Service." This option allows you to add your own terms of service. However, it's important to note that these terms will only apply to custom domain URLs. The same changes can be applied to the custom URL.

  • Here is the video clip to create Terms of Service.

custom domain _terms of services (2).mov

  • CyberCNS has the capability to patch 3rd party applications using the Remediation Plan.

  • Patching ability can be enabled post accepting EULA terms from this section.

  • When you enable the patching status, an option to patch the applications at the Company level is enabled.

Tags created under CyberCNS can be managed under this section for action such as deletion, bulk deletion.

  • In the asset section, the tags can be added for the required assets.

  • At the Global level, under Settings, all the tags are listed with details like it’s added for which asset and under which company.

  • The tags can be deleted from this section as per the requirement.

  • Number of tags, Companies associated with the tag, and assets associated with the tag count will also be shown.

  • Under the Jobs section, the tags deletion job status can be seen.

  • In the Manage Agent version section, can set the Default Agent version and Specific Agent version.

  • In the Default Agent Version, select the LATEST version or any other version as required.

  • In the Specific Agent version section, can set the specific agent version for the required company by selecting any of the companies as a choice.

  • For the specific company, under the Action column click on the change option to update the selected agent version.

  • Change the Agent version to the required version and click on Update.

  • In the confirmation dialog box, select either Yes or No as required.

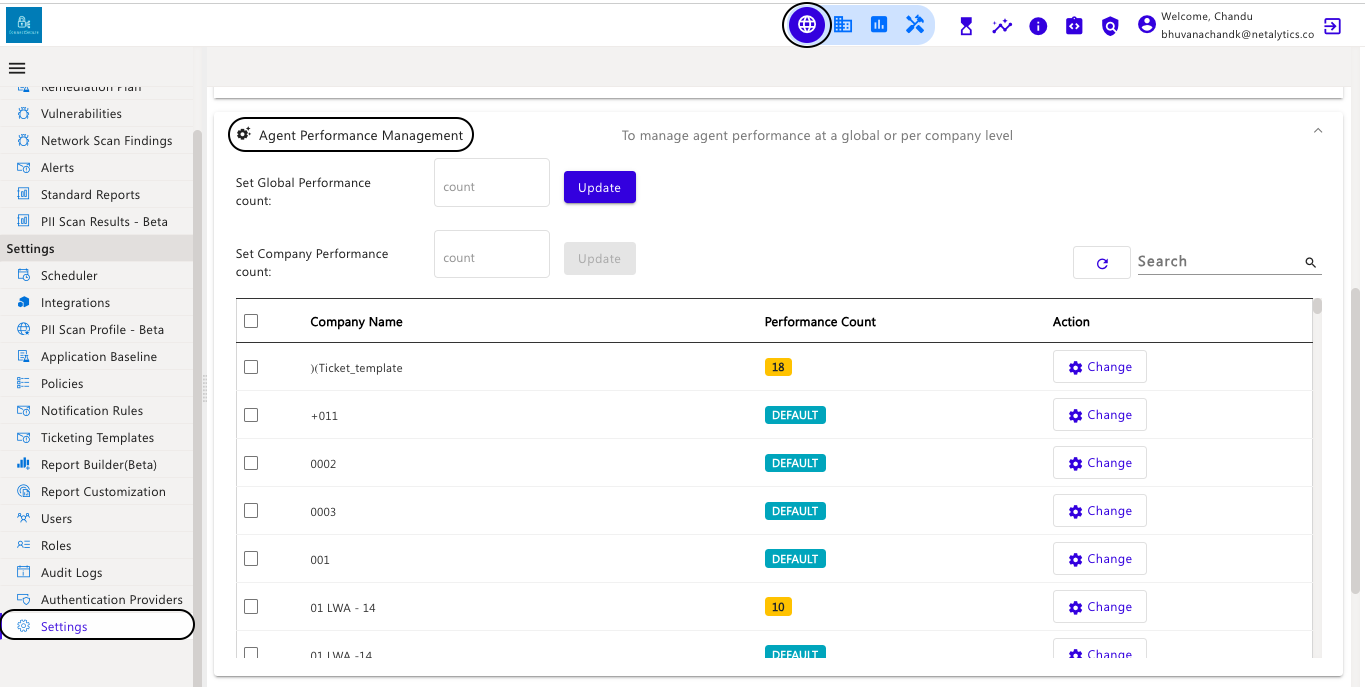
  • This Agent Performance Management allows us to update Probe Performance settings at both the global and company levels.

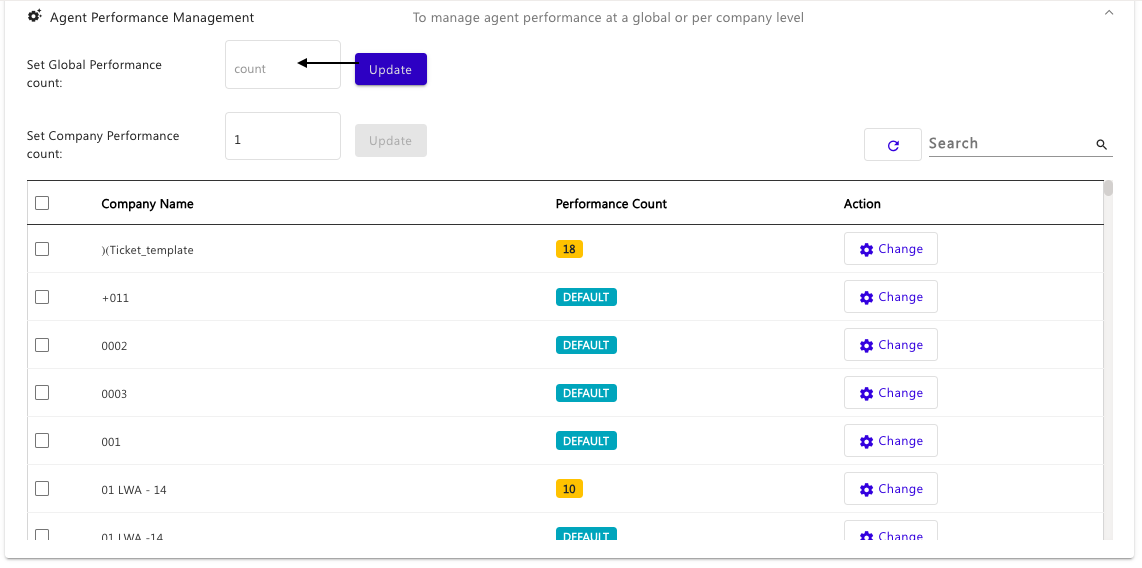
  • Click on Set Global Performance and add the count.

  • Click on Update to update set global performance count.

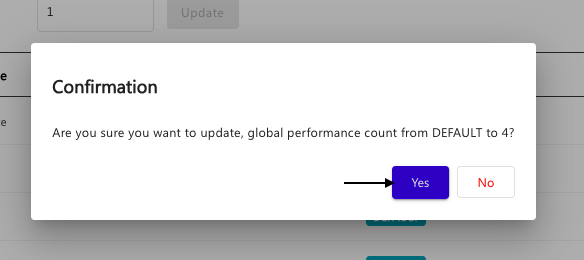
  • After clicking on the update popup appear global performance count form DEFAULT to eg:4.

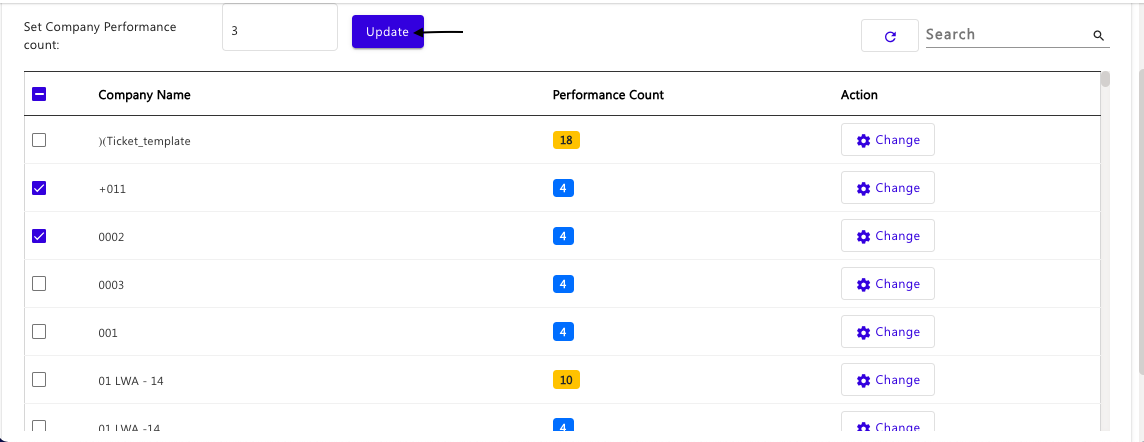
  • Click on Company Name to set the Company Performance count.

  • Click on update.

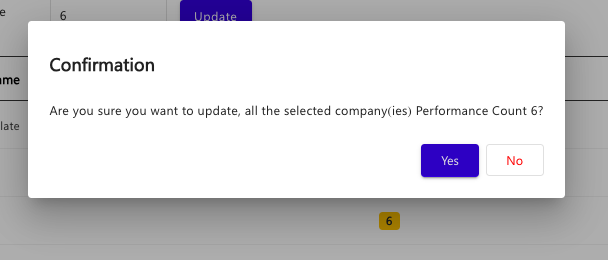
  • After clicking on the update popup will appear for confirmation as all the selected company(ies) performance counts eg:6

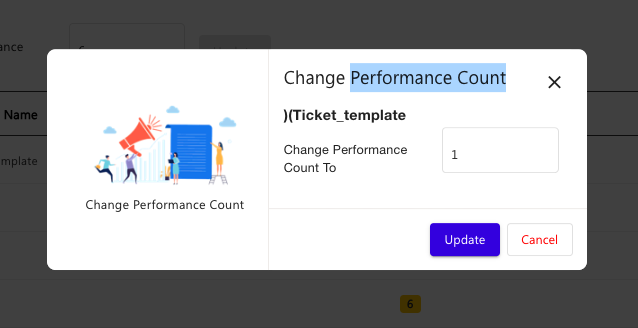
  • Click on Change to change the Performance Count for a particular company.

  • After updating the counts, Click on update.


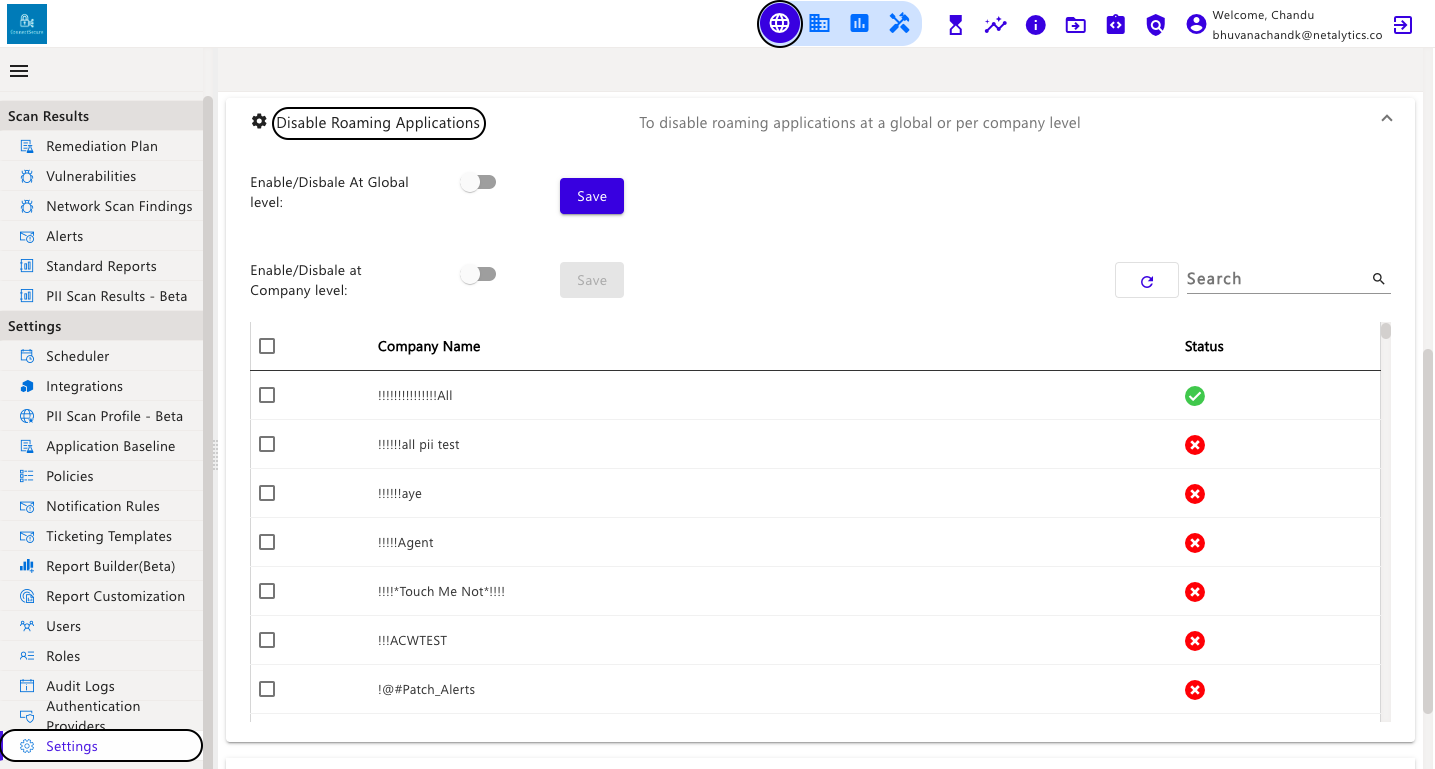
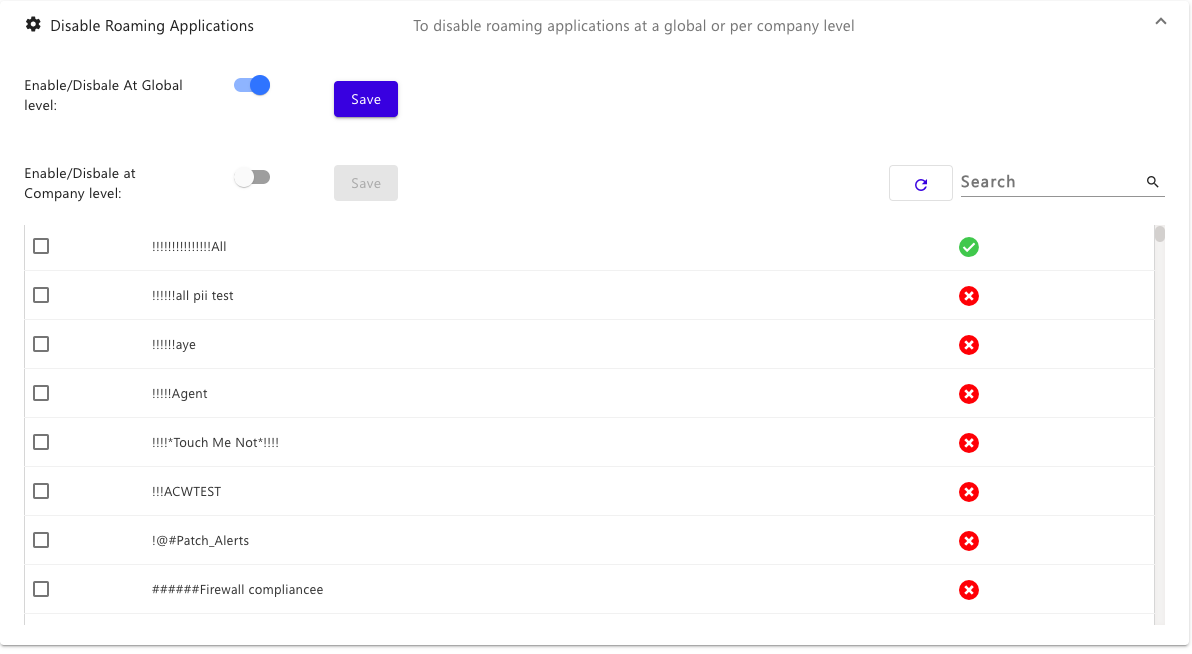
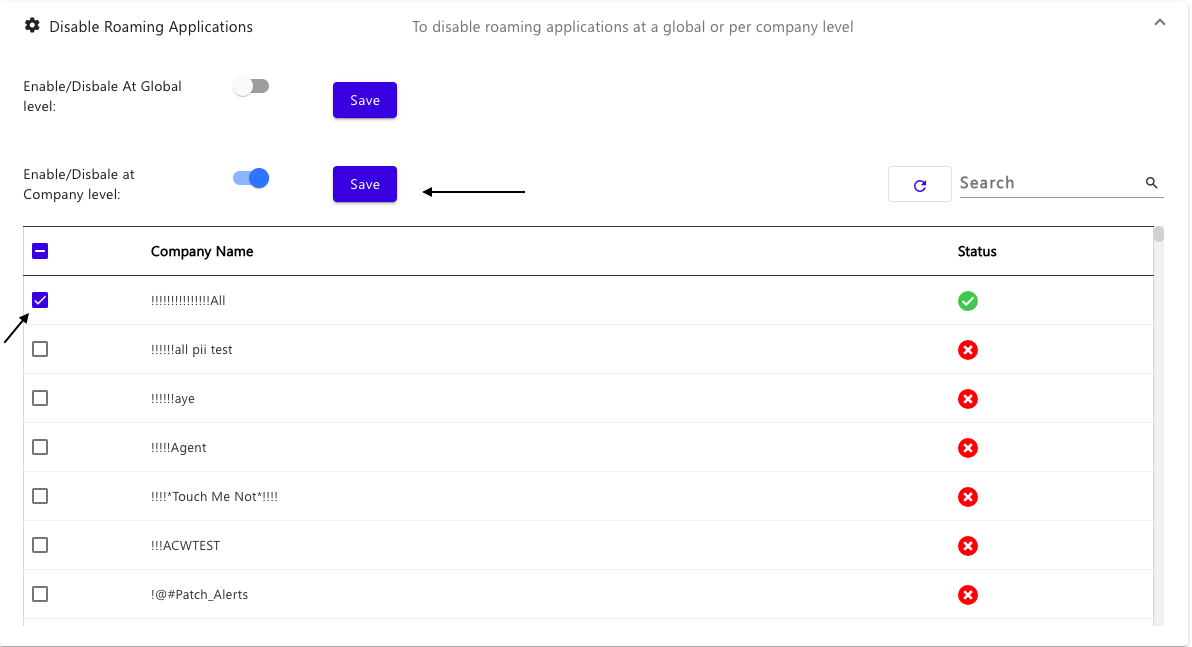
  • Disable Roaming Applications, allows us to Enable/Disable Roaming Application at both the global and company levels.

  • If the Roaming path status Is Enabled in Global level. It will discard the vulnerability scan for all the companies.

  • For Eg: "C:\Users\Username\AppData\Local" whichever the application is present in this path. If it is disabled then it will scan for roaming applications in this path.

  • Click on Save to save the settings.

  • If the Roaming Application status Is Enabled in Company level. It will discard the scan only for selected company/ies.

  • For Eg: “C:\Users\Username\AppData\Local" whichever applications are present in this path, If it is disabled then it will scan for roaming applications.

  • Click on Save to save the settings.

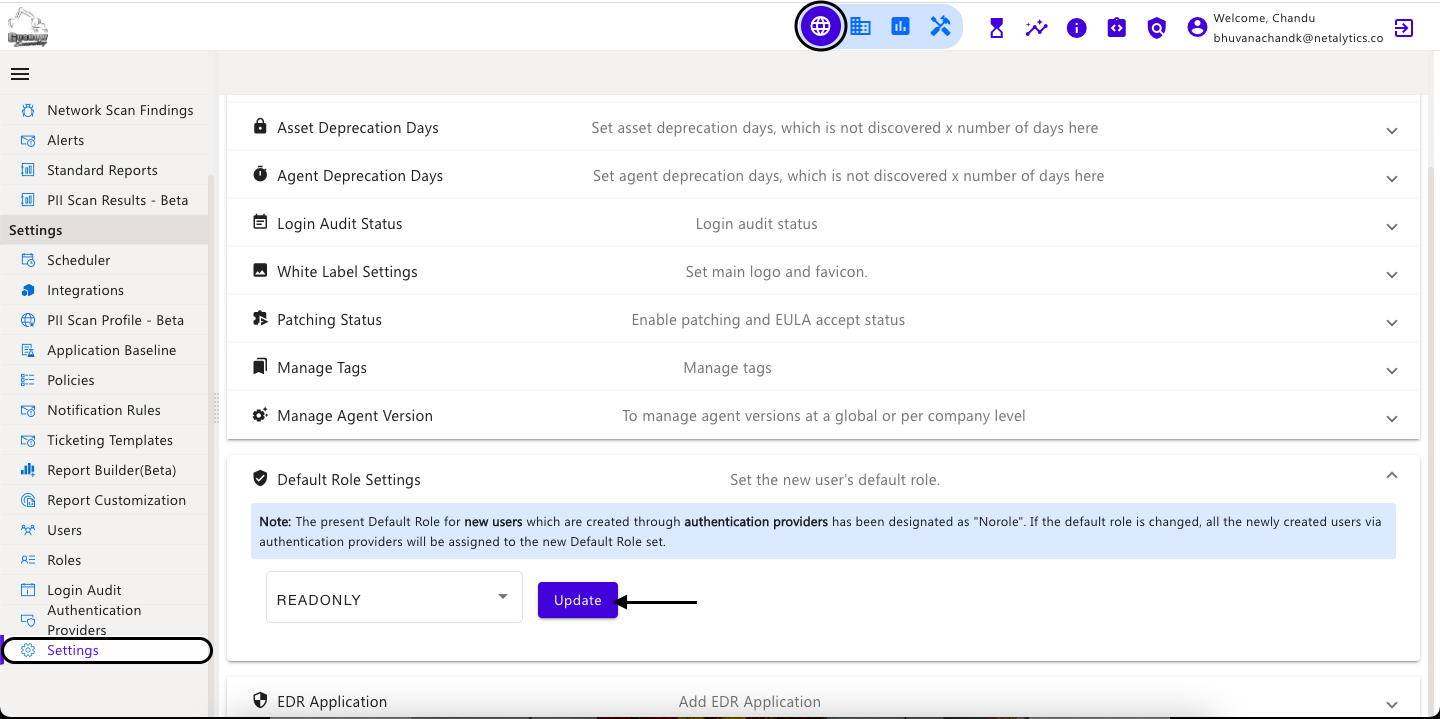
  • If the default role is changed, all the newly created users via authentication providers will be assigned to the new Default Role set.

  • Select any role from the drop-down and click the Update button.

1.The Global EDR applications contains the list of antivirus applications shown in the security report card for the respective assets.

2. Any application that is not already listed as antivirus under Global EDR applications can be added here. Please run a scan after adding it to reflect the application name in the security report card for all the assets.

3. To Exclude any application from the Global EDR applications list, please click on the 'X' for the selected application.

4. The application which is added manually and if that application is excluded then this application cannot be reverted back to the Include application list. But the default applications which is excluded, can be reverted back to the include list.

  • To add the EDR application manually, click on the +Add button.

  • Enter the required fields and click on Save.

  • Here can select the checkbox to Enable Regex.

(blue star) Example: If an application name is set as Microsoft, all Microsoft applications will be listed in the Included list of EDR applications.

  • Click on the icon →((error) ) for the application to be excluded.

  • On the confirmation dialog box select either ‘Yes’ or ‘No’ to exclude the application.

  • Once the application is selected to exclude, the application will be listed under the Excluded EDR Application list.

  • If the application is installed for that asset, please run a scan after adding it to reflect the application name in the security report card.

  • Click on the Global view Icon and Navigate to Settings. Choose Custom Domain Name from the settings listed here.

  • Enter your Domain Name.

  • Choose the Domain Registrar where you  want to publish Custom Domain

  • With the same Domain Registrar generate your own SSL certificate and private key either PEM or CRT. The SSL algorithm must be in RSA format.

  • Once the certificate is generated, please upload it in the portal.

  • Allowed IPs are not mandatory, but you can also add your IPs of your network.

  • Once IPs are added they can be deleted/edited.

  • Once it is uploaded, confirm the update by clicking on the Yes button

  • After uploading the certificate, A record DNS entry needs to be added. Once the DNS entry is added, the Domain is configured & create A record with the mentioned IPAddress.

  • In case of renewal of SSL Certificate, Re-import certificate to be followed

This completes the process of creating a Custom Domain.

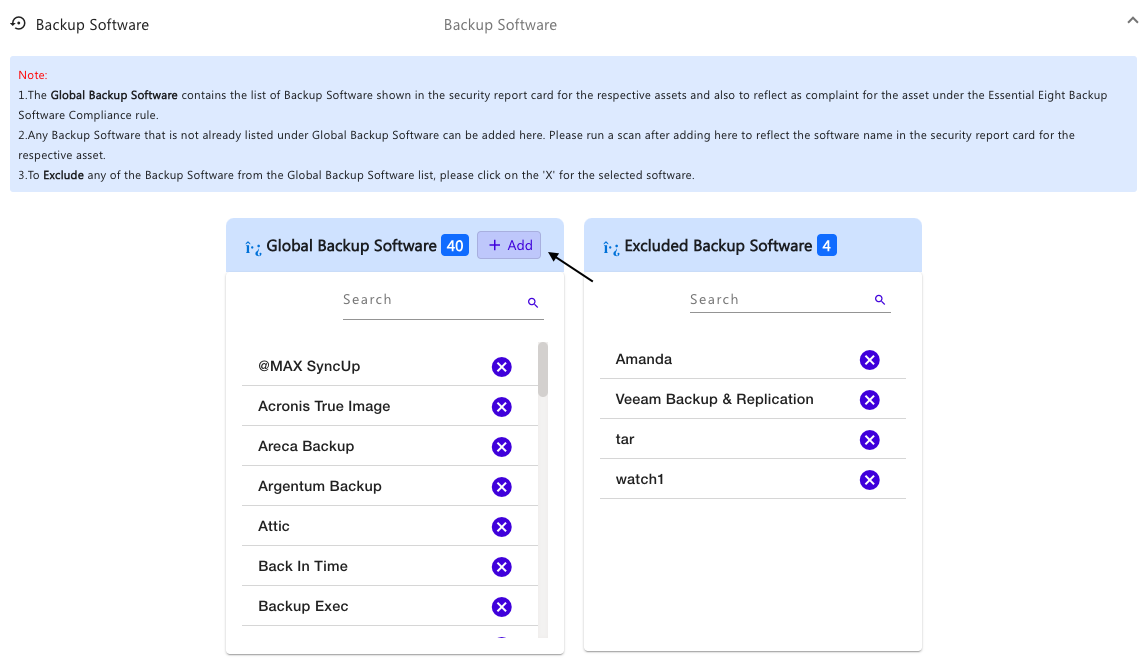
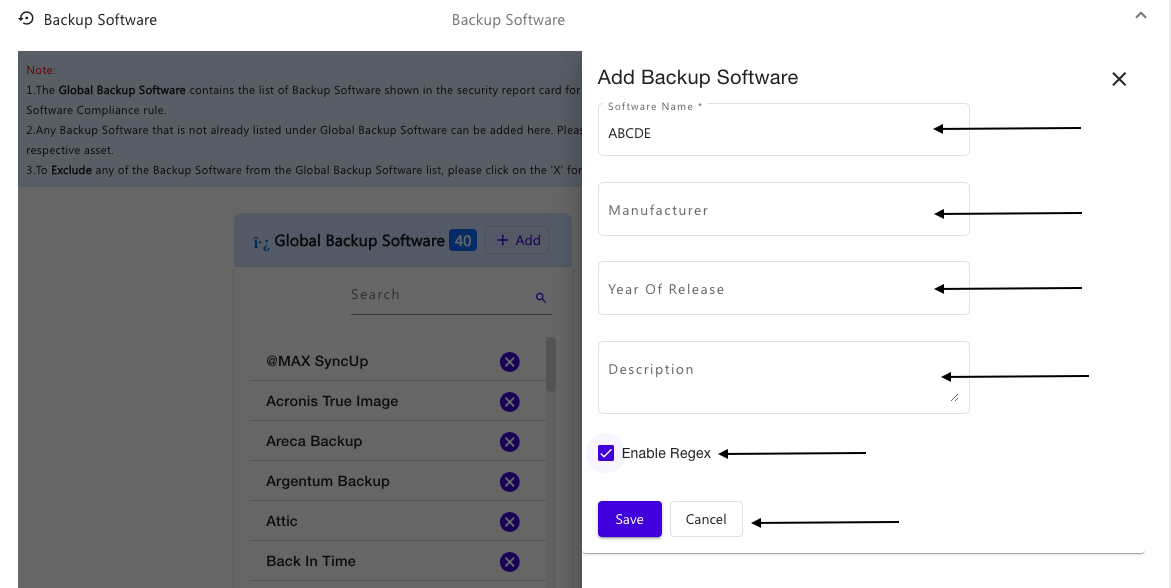
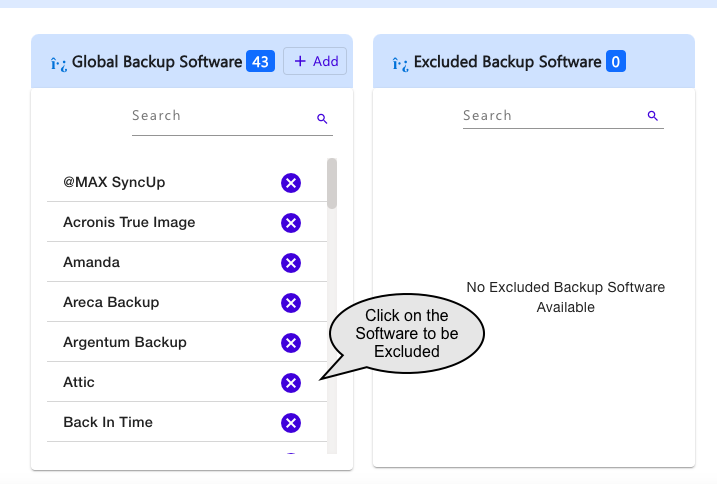
  • To add Global Backup Software, Click on +Add icon

  • Enter the required fields and click on Save. If the Regex is enabled,

  • Click on the icon →((error) ) for the application to be excluded.

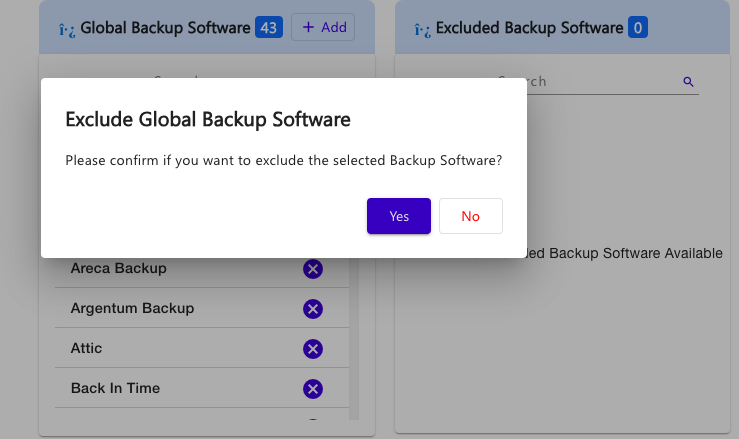
  • On the confirmation dialog box select either Yes or No to exclude the application.

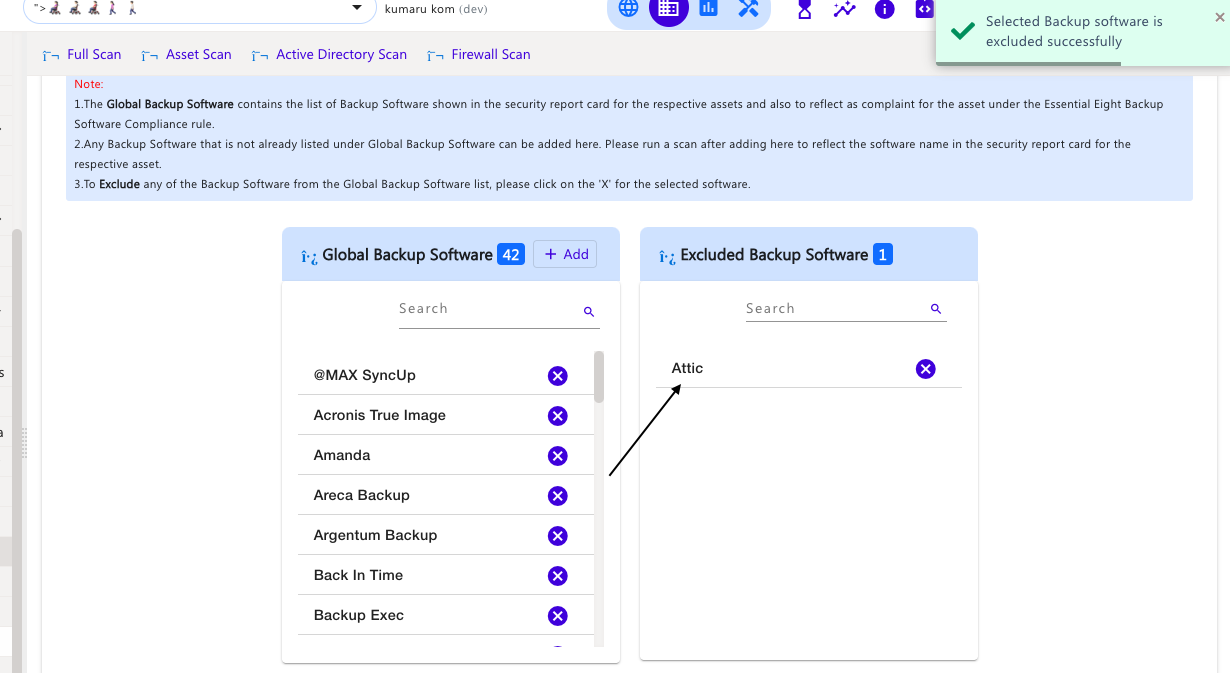
  • Once it is excluded it will be listed under Excluded Software.

  • If the software is installed for that asset, please run a scan after adding it to reflect the application name in Installed Applications.

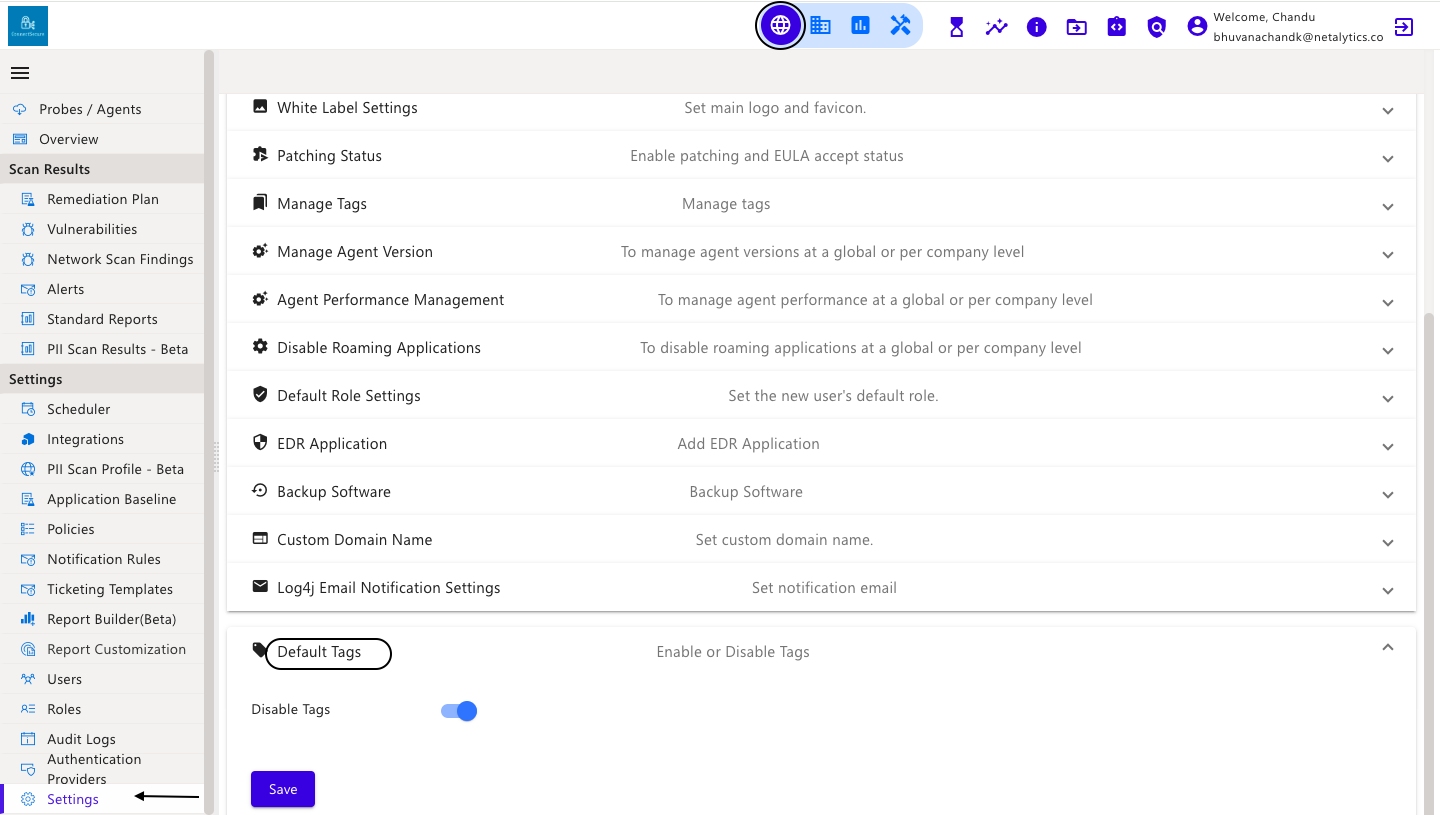
  • The default tags option to enable and disable under the settings at both the Company level and the Global level to help us only look at manual tags or all the tags.

  • If this option is disabled, after the scan itself, then only the manual tags will appear for that particular company. under the assets. The default tags will not be shown and Click on Save.

  • If this option is enabled, after the scan, it will show all the tags for that company under the assets.

  • Click on Save to save the settings.


This completes the Settings section.